There are numerous events when a few tutorials we say you need to empower USB Debugging method of your device. It appears to be perplexing and just deserving of developers, however nothing further. If you read articles as this where we show you how to install custom ROMs, Root your Android phone, etc... without a doubt you read a few times that you must activate the "USB Debugging" mode. Usually we disclose how to do it in that spot rapidly, however today we discuss a little on the subject and clarify what it is and how it functions. After additionally we will disclose how to turn on or deactivate USB Debugging mode of Android.
The "USB Debugging" mode is expected essentially for developers as well as users. The USB Debugging mode opens direct access to the system with the help of Android SDK (Software Development Kit). In the event that you download and install on your PC, Android SDK, however, not initiate the debugging mode. It will not work on the grounds that you cannot interface with the device. The USB Debugging mode is also helpful for end users for different operations, like backup data to computer, recover deleted files or transfer data between two phones..
Let's see how to turn on USB debugging for your Android device including HTC, Motorola, Samsung, Sony Xperia, Lenovo, LG, Google Nexus. Different OS have different methods for USB debugging.
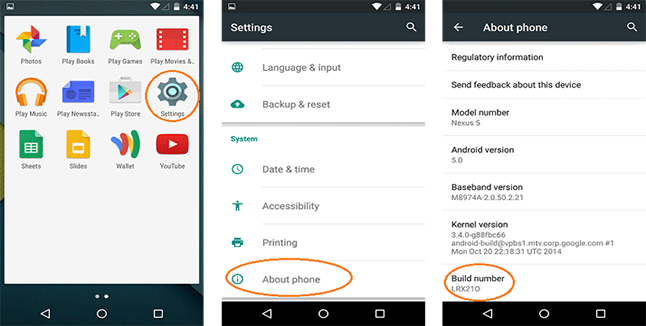
To enable USB Debugging on Android 5.0 Lollipop is the same as Android 4.2.x.
1) On your phone, go to settings menu, tap "About Phone" option. Settings > About Phone > Build number > Tap it 7 times to become developer.

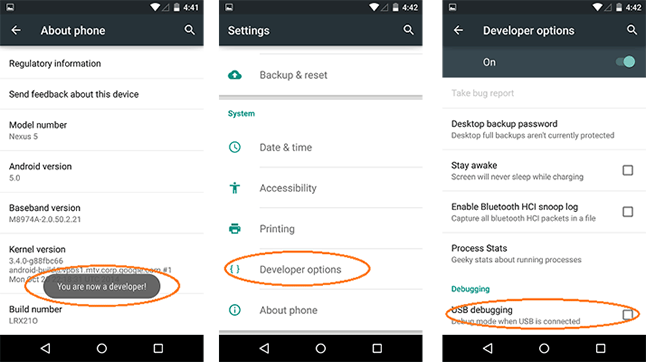
2) Go back to the previous screen, and tap the "Developer Options", you will see USB Debugging, check it and click OK on the prompt. You can now enable and disable it with a same way.

Many people may not know that the "USB Debugging" and "Developer Options Menu" has been hidden in the Android 4.2 or higher version, just try the following steps to turn on it.
1) Go to Settings > About phone.
2) Scroll down to the bottom of the About phone and enter “Build number.”
3) You need to tap "Build number" seven times, you'll see "You are now 3 steps away from being a developer". click it, you'll get a dialog saying that you're now a developer.

Go back to Settings and now access the "Developer options menu", then tap the USB Debugging checkbox.

1) Just direclty navigate to Settings > Developer options and enable them.
2) After you enabled the developer options, then you can be able to check the USB Debugging field.

In this situation, it is exceptionally basic. We simply make a beeline for Settings - > Applications -> Development -> USB Debugging and activate. As straightforward as this.

As should be obvious is extremely basic and is a procedure that takes not as much as a moment. You can turn on and off to your loving, contingent upon when you require or not. You need to enable the connection between computer and Android. When you no longer need more USB debugging mode, you will just go to the "Developer Options" and uncheck the box "USB debugging". To activate it again mark the box and ready.