The screen of your Android smartphone is broken? Apart from the considerable damage, the problem is how to recover the files, which is much important than the screen itself. If USB debugging mode was turned on, then it is very easy to recover your files in this case. You can connect the device directly to a PC and recognized as an external memory so you can access folders and retrieve the files.
However, the situation is a bit complicated when the USB debugging mode was turned off, which means there is no chance to backup the data as normal because the screen was broken. Here in this article I will share you two different methods to backup your data with a broken screen and hope this will work for you.
This is the most effective way to enable USB debugging on a broken or cracked screen. First, you have to buy an OTG Adapter. Then connect your phone and USB mouse with the adaptor. Now, you can use the mouse to make actions on the phone.
Note: Please make sure your phone is compatibale with OTG adaptop. You can check the list from here:
https://www.symlis.com/blog/2015/1/12/list-of-otg-supported-devices

The mouse will drain out the battery so charge the power with full capacity. After that navigate the settings and menu with the mouse. However, if the screen was black, then you can mirror Android screen on a computer. After USB debugging is turned on, then you can recover deleted files from broken Android in an very easy way.

Android has a powered tool called SDK, designed to debug problems with Android devices. Within the SDK, there is a tool called ADB that allows you to connect to your Android device via USB and execute a series of commands without touching the screen. It also allows you to enter a shell on the device!
If you do not have ADB, then download and install Android development tools from here. You can find the ADB command in the platform-tools directory. ADB can't communicate with a phone without "enable USB debugging." The way to open would be to boot your device into ClockworkMod Recovery, by pressing and holding the power button + home + volume up or down is depending on the model.
Step 1: When the ClockworkMod recovery is loaded, check the connection with ADB running.
Step 2: Type this in command prompts: adb devices
Step 3: Then agrees to backup all phone data (this takes a few minutes) command:
adb pull / data / media / clockworkmod / backup ~ / Desktop / Android-up
Note: If you don't have advanced computer knowledge, then don't use adb commands, as a simple mistake could damage your phone permanently. In addition, if you have confusion with Method 1 then don't go for it. Try the Method 2 as it is much safe, fast and easy process compared to the Method 1. For Samsung Android devices, you can follow this guide to recover data from broken screen.
There is an useful program called Android Data Recovery, which is specially designed to perform data recovery from a broken screen. It is the first software that allows you to retrieve data from Android devices with a broken screen or touch screen no longer functioning. Just follow the steps below.
Step 1: Download and install the Android Data Recovery on a windows PC. Then connect your Android phone to the computer.

Step 2: Launch the program and from the left sidebar, you will see an option "Android Data Extraction". Click on "Start" to start the wizard. You will be asked to select the data you wish to retrieve and click on "Start" to proceed.

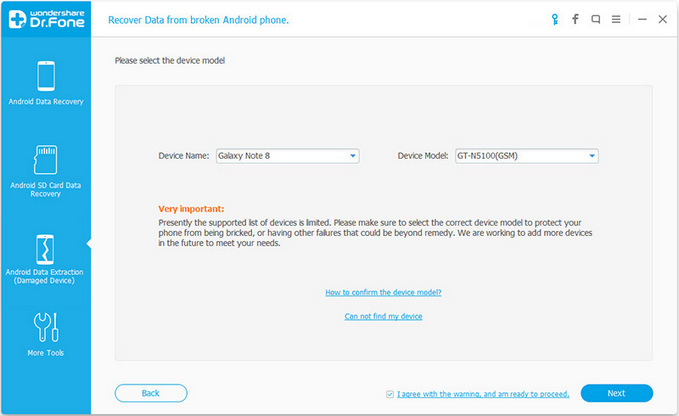
Step 3: Choose the type of problem you have with your phone and click on one of the two cases: Touch screen not working or All black screen (or broken). Select the model of your Android device and then click on "Next" to proceed.

Step 4: Enter the download mode of Android by following the on screen instructions.

Step 5: The program begins analyzing the whole device to locate the files. After this , all the scanned files will be listed into categories. You can preview and backup the selected data to computer.

If this procedure is done properly, the program will be able to scan your Android phone's memory and will start to recover all the data in it. When the scan is completed, you will see a window with all the files found and you can select those to save on your computer.