There are times when one may want to showcase videos, apps, photos, games or even projects to a wider audience. However, with the advent of Android phones, most of this data is stored in a small space and conveyed on tiny screens. Given the fact that Android phone screens are designed for just a few eyes, figuring out a way to mirror content on Android and to broadcast it through a wider channel can be a plus whether you are a student, professional or entrepreneur.
By recording Android screen, you can play games on a wider screen or even interact with your partners differently. You can even prepare your presentations on mobile and showcase them to potential investors in a matter of minutes.
The challenge however, comes when you are using an Android device and want to relay content on a Windows PC. As you know, Android is made by Google and Windows by Microsoft. They are two different companies that compete for dominance on the IT space. Due to that, there is no straightforward way to connect the two devices. Fortunately, there is a good Android Screen recording app that specifically helps you display what is on your Android mobile phone straight to your PC. This app is called Android Screen Recorder.
Unlike other screen recording apps, which requires the device being rooted before using, this one can freely record or capture Android screen without root. Plus screen recording, you can also use this app to recover deleted files, backup & restore Android, root Android, remove lock screen and unlock SIM card. Basically, it is the ultimate tool you should own a copy if you have an Android phone.
First, download the software and follow the prompts to install it on your computer. Once the installation process is complete, go ahead and launch it (you can do this by right clicking or double clicking on its shortcut button).

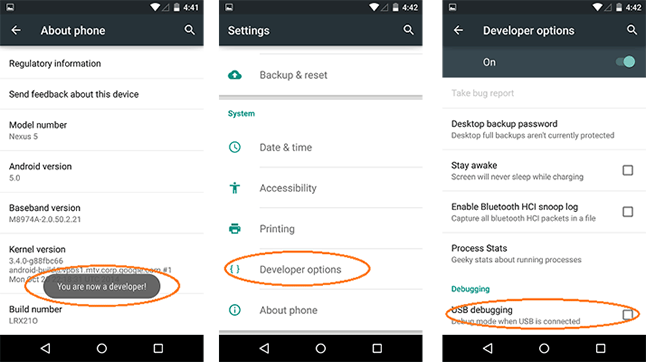
It is important to ensure that USB debugging is activated on your Android phone to enhance this connection. To connect your device to computer, you simply need to use the USB cable. The software is designed to automatically synchronize with your device once a connection is established.

This step is automatic and starts immediately when Android phone has been successfully connected. The software mirrors the Android screen. Therefore, any activity done on the Android screen, it will be displayed on the computer.

To start recording screen on Android, click on the Android Recorder icon (red mark area on above image). The icon is located just above gear icon, which is on the right navigator control bar

A message will then pop up on the screen requesting to know if you want to record or not. To start recording any activity on the Android screen device, simply click on "Start Now". However, just in case you would like to stop the recording, click on the red button on the top of the screen and the recorded data will be saved on computer desktop. But for more convenience, you can always choose where you want the recorded video being saved via "Record Settings".

Besides screen recording, Androidphonesoft Android Screen Recorder is also capable of taking screenshot on Android via PC. When you open the program, there is camera icon shown on right navigation bar. Now, go to the screen you want to take screenshot. Then click screenshot icon and choose a location to keep the image being captured.

Conclusion: Whether it is your first time trying to record screen on Android or not, Android Screen Recorder is the great app to use. It is easy to use, fast, safe and supports all versions of Android devices available in the market. It simply makes the task of recording Android screen as easy as taking a screen-shot without any hardware commands.