UltraISO is a well-known ISO burning software used by millions of people all over the world. It does have its disadvantages, but over the years it has become a Windows favorite. Let's see what benefits it offers, how to use it, potential pitfalls and the best alternative software to UltraISO.
UltraISO image burning utility has multiple functions. Apart from being able to create bootable drives and disks by burning ISO images, mounting ISO on virtual drives, create ISO from files and folders and create backups of your media as ISO files. In addition, you can extract, add and remove items from ISO files without first having to burn them to a disk. You can also interconvert to and from several types of disk image formats like NRG, CCD and MDS.
UltraISO also provides power users with advanced settings for file system type and other parameters, which makes it ideal for anyone who regularly works with disk images, either to handle media files or do software installations and repairs. It integrates well with the Windows ecosystem so ISO files can be opened or edited directly from their location by using the context menu (right-click.) and preset file associations.

One of the big advantages with UltraISO is that it can compress ISO files even further in order to reduce the amount of space they occupy. However, it depends on the type of media you have in the files. For example, doing a ‘heavy compression' on an ISO containing audio files won't make much of a difference, but the same thing applied to an ISO containing documents and text files will shrink it by about a third of its original size.
Cons:
ISO file burning is the most used feature by UltraISO. We are going to share how to use this program for burning ISO file. Other features are easy to get started and self explanatory. Below is an outline of the method to be used when burning an ISO file to a CD or DVD. Follow the steps exactly as described:
Step 1 : After installing UltraISO on your Windows machine, insert a writable CD or DVD and then launch the program.
Step 2 : Go to "File >> Open" or use the shortcut ‘Ctrl+O' to import the ISO file into UltraISO.
Step 3 : Click on "Tools" and select "Burn CD/DVD Image."
Step 4 : Click "Burn" to initiate the burning process.

Although it looks simple enough, that's not the case with all users. Novice users may get confused by the layout, and the complex settings can be very perplexing if you aren't used to them. There are also other problems typically faced by UltraISO users, as highlighted below.
Apart from the drab interface that lacks esthetics, some users have reported installation problems, as well as other issues after installing UltraISO. The software sometimes repeatedly shuts down or freezes, which means it has to be restarted each time, and your progress may be impeded by frequent disruptions. Moreover, users have reported Error 3, Error 87 and Error 5, for which the symptoms include frequent computer or application crashes. In still other cases, the ISO files in the burned media may become corrupted, rendering the disk or drive completely useless.
But the real problem is the cluttered interface that isn't user-friendly for novice computer users. This problem is compounded if you don't have any experience working with disk images because you may not know beforehand if the settings are correct for the type of ISO and type of storage media you've chosen to burn it on.

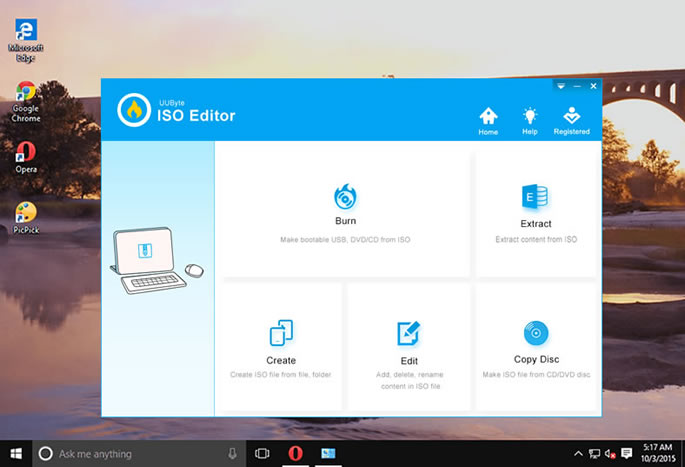
So, what's a good replacement for UltraISO? My recommendation is Androidphonesoft ISO Burner, which is an advanced software with a clean interface that is highly intuitive to use. It offers all the functionality of UltraISO, but is far less complicated for new users to figure out. ISO Burner can edit and extract files from ISO, copy files to a disk and even create ISO from files and folders. In addition, you can easily add or remove individual files from ISO without having to mount it on a virtual drive or burn it to a disk first.
ISO Burner has been extensively tested at beta stage and is rapidly becoming the number one media authoring software for both Windows and Mac computers. The utility automatically detects the type of storage media and applies the appropriate default settings. If you're a new user, you don't have to worry about wasted disks or confusing settings. The process below shows you how to burn an ISO image to a DVD or USB drive in a matter of minutes.
Download the Windows version of ISO Burner from the this website, and install the application by following the instructions on screen.

Launch the program and select "Burn" from the various options on the home page. Then insert a blank CD or DVD disc to the computer.

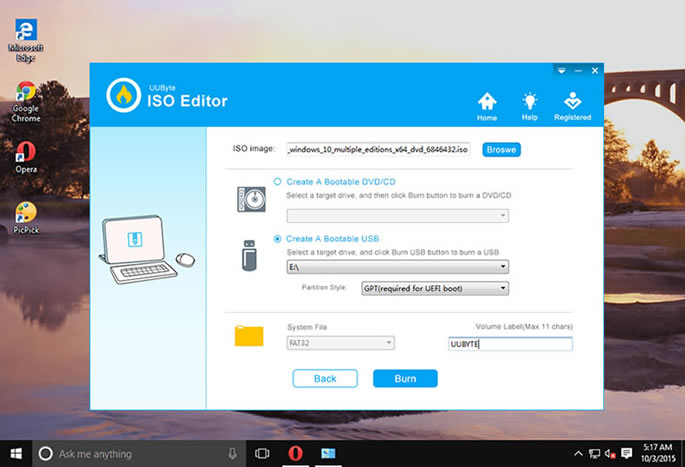
Browse and select your ISO file, set the target storage media (CD/DVD or USB) and click "Burn" against that option to burn the file to the chosen media device.
That's all there is to it. Three steps and even a novice will have no trouble burning ISO files to a disk or drive. The software is fully compatible with the latest Windows 10 and macOS versions, and supports multiple file formats. It also works with both legacy BIOS and UEFI boot schemes. Most importantly, new users won't have to worry about these settings, but advanced users can tweak them if required.