As we all know, only branded or OEM manufactured computer has an OS in it. If you were building a new PC by your own, then you have to install the operating system manually. In this post, we will share a complete guide on how to install Windows 10 from USB, a better choice than portable hard drive or CD/DVD.
Part 2: Where Download Windows 10 ISO
Part 3: How to Burn Windows 10 ISO to USB
Windows 10 is the most popular desktop OS and millions of users switched from old version like Windows 7 or Windows 8 because of the free upgrade policy announched by Microsoft in 2016. And there are many reasons why you should install Windows 10 on a new computer.
User Friendly Interface: Windows 10 doesn't opt for a broader menu that uses up the whole screen. Instead, a similar menu in miniature form is displayed. This way, users are served with the leisure of multi-tasking at its best. App-Tiles could be easily swapped with apps that you tend to use more frequently.
Optimized Hardware Performance: The previous Windows version, especially Windows 8/8.1 eats up a lot of computing resource by the OS alone. So the computer becomes lagging when multiple apps are running. However, Windows 10 does much better than old version due to optimized system instructures.
Long-time Support: Windows 7 support by Microsoft will be discontinued in 2020. No official pitch or update available any more, which is very dangerous to potential threats. However, Windows 10 is still valid for a couple of years ahead at lest. Bugs and pitfall will be fixed by Microsoft team.
The first step to install Windows 10 on a new PC is to download Windows 10 ISO image. The good news is that you can download the file directly from Microsoft website instead of untrusted third-party download portal, which was the only choice in the past. However, if you already had Windows 10 ISO at hand, then skip this part.
Step 1: Open Microsoft Edge Browser and load Win10 download page: https://www.microsoft.com/en-us/software-download/windows10
Step 2: At this point, just right-click a blank part of the page and choose 'Inspect Element'

Step 3: Debug tool would open up. Now, spot a function named 'Performance menu'. Make sure it's the right selection, then select 'Emulation' (Look for an icon that depicts eject if this option isn't visible)
Step 4: Under 'User Agent String', Select Apple Safari. This sets apple's user agent over your browser to remove download restriction.

Step 5: Now the page will be reloaded and the download get started.
When the ISO file was downloaded completely, the next step is to burn it to USB. Actually, Microsoft offers such a tool in default but it doesn't work pretty well according to user feedback. So in this part, we will use Android ISO Burner to make a bootable USB from Windows 10 ISO.
ISO Burner is a powerful burn-oriented utility that has seamless support for Windows 10 and its variants. One notable advantage is the bleeding fast burning speed. It takes much less time to complete the burning process with decent success rate. In addition, it also has good support for old and new USB drives from multiple brands.
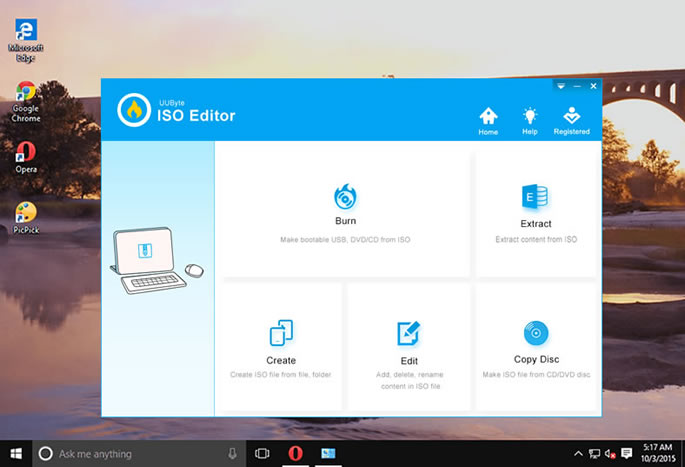
Step 1: Download and install ISO Burner. When its interface pops up, select 'Burn'.

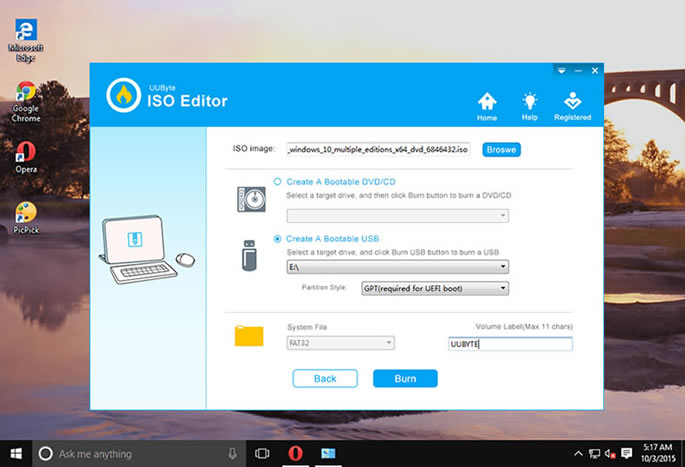
Step 2: Insert an USB flash drive and see if it's visible in the tool. Later, click 'Create A Bootable USB' option and your flash drive's name.

Step 3: Click 'Browse' to import downloaded Windows ISO file that you'd like to burn. Move on and initiate the burning process.
Step 4: USB burning typically takes just 5-10 minutes and the status bar keeps you updated on burn completion. There you go, a bootable Windows 10 USB stick is successfully created.
When the bootable USB is ready, the next step is to install Windows 10 from that USB on the new PC. The below steps will guide you through the process.
Step 1: Insert the bootable Windows USB into the new PC and power it on.
Step 2: Open up boot menu by clicking a special key (F11 works on most of the time).

Step 3 : Select 'Burn from USB' option and head on to choose the USB under 'Please select boot device'.
Step 4: The Windows 10 installation window pops up when the USB being recognized by the computer. After that, follow the Windows 10 installation wizard to finish the task.
Most of the devcie drivers are not installed after Windows 10 installation. To let the hardware working normally you have to install or update the drive accordingly. The most important device driver you should install after installation is Internet card. Without Internet access, auto-drive update is impossible. If not, then you should download it from somewhere and copy it to new PC via USB.
Step 1: On 'Start', search for 'Device Manager' and open it up.
Step 2: Select the type of drivers you wish to update among the sorted list. Right click and select 'Update Driver'
Step 3: After that you're left with 2 options to either let windows search or select downloaded drivers manually.
Step 4 : Select 'Search automatically for updated driver software' and windows should start scanning online repositories and will get back to you if an update wasn't found. Similarly, you can confirm to download the file if an update is available.

Assuming you took a read on the whole guide, you must've understood how to install Windows 10 from USB. Fairly, Windows 10 has surprisingly contributed tonnes of advancements that really matters. In case you prefer to follow up the burning process using a flash drive. It's mandatory you must put to use something professional like ISO Burner for stable results.