Table of Contents
Navigating through the digital ecosystem can be a daunting task for many, especially when it comes to managing our beloved music collections. Whether you’ve curated a playlist for every mood or you’re an audiophile with an expansive library, keeping your tunes accessible at all times is a must. But how does one ensure their carefully chosen music can accompany them on the go? This guide provides a step-by-step walkthrough on how to transfer music from Mac to iPhone without iTunes.
We will explore the different methods available to add songs to iPhone, including the newer Music app, or third-party software for more specific needs. Our guide is designed to make the process seamless, even for those who are not tech-savvy. By the end of this tutorial, you will be able to enjoy your favorite tracks and playlists on your iPhone, no matter where you are. So, sit back, relax, and let’s dive into the world of music transfer between Mac and iPhone.
Can I Directly Copy Music to iPhone from Mac?
Copying music files from Mac to your iPhone with a USB drive isn’t supported due to Apple’s content management system. Music and other media files are typically transferred and managed through specific Apple software like iTunes for older versions of macOS, or the Music app on more recent versions of macOS.
However, you can use an array of third-party applications designed to bypass the iTunes/Music app restrictions and allow for a more direct transfer of music files from your Mac to your iPhone. Examples of such applications include FoneTrans.
How to Transfer Music from Mac to iPhone without iTunes
iTunes is now not the ideal solution for music sync and transfer between Mac and iPhone. Instead, the new Music app and thir-party software are more recommended because of compability and use-friendly experience. In here, we will show three different approaches to help you transfer music from Mac to iPhone without iTunes.
Method 1: The Music App on Mac
The Music app is Apple’s replacement for iTunes on macOS. Introduced with macOS Catalina in 2019, the Music app provides a fresh and streamlined way to listen to music, podcasts, and watch TV shows and movies on your Mac. Here’s how you can transfer music from your Mac to your iPhone using the Music app:
Connect your iPhone to your Mac: Use your iPhone’s USB cable to connect it to your Mac. If prompted, trust your computer on your iPhone.
Launch the Music App: Click on the Music app icon on your Mac’s Dock or use Spotlight to find and open it.
Select your iPhone: Once your iPhone is connected, it should appear in the sidebar of the Music app. Click on your device’s name.
Choose Sync Settings: In the settings window that appears, click on the "Music" tab. Check the box next to "Sync Music onto [Your iPhone’s name]."
Select Music to Sync: You can choose to sync your entire music library or select specific artists, albums, genres, or playlists.
Start Sync: Click "Apply" in the lower-right corner to start syncing your chosen music to your iPhone. The progress and completion of the sync can be viewed at the top of the Music app window.
Eject your iPhone: Once the sync is completed, click the eject icon next to your device in the sidebar before disconnecting it from your Mac.
The Disadvantages of Music App for Content Syncing:
While music synchronization between Mac and iPhone through iTunes or the Music app is a convenient feature, there are several potential downsides that you should be aware of:
Overwrites Existing Music: When you sync music from your Mac, it overwrites the existing music library on your iPhone. This can result in a loss of music if there are songs on your iPhone that aren’t present on your Mac.
One-way Transfer: The standard iTunes/Music app sync is primarily a one-way transfer, from your Mac to your iPhone. It doesn’t allow for music transfer from your iPhone to your Mac, which can be problematic if you want to move music that you’ve downloaded directly on your iPhone to your Mac.
Single Library Limit: Your iPhone can only be synced with one iTunes/Music library at a time. If you attempt to sync your iPhone with a second library, iTunes/Music will warn you that your iPhone’s music will be erased and replaced with the new library.
Take Too Much Time: You have to wait minutes even hours even for only a few music added from your Mac to iPhone. The Music or iTunes app will check the whole library and sync them to the iPhone. This will dramatically slow down the syncing process.
Method 2: FoneTrans iPhone Manager Software
In act, the Muisc app is not the best way to import music from a Mac to iPhone as it is a complicated and time consuming process. Instead, the third-party iPhone manager software are more convenience and fast.
Aiseesoft FoneTrans is a popular third-party software that allows users to transfer data, including music, between their Mac (or PC) and their iPhone. Here are the steps to transfer music from your Mac to your iPhone using Aiseesoft FoneTrans:
Install Aiseesoft FoneTrans: Download the software from our website and install it on your Mac.


Connect iPhone to Mac: Take out iPhone’s USB cable to connect it to your Mac. If prompted, trust your computer on your iPhone.
Launch Aiseesoft FoneTrans: Once your iPhone is connected, open Aiseesoft FoneTrans. The software should automatically detect your iPhone and display a summary of its contents.

Go to the "Music" tab: In the left-hand column of the FoneTrans interface, select the "Music" tab to view your existing music library.
Add Music to the iPhone: To add music from your Mac, click the "+" icon at the top left corner and browse for the music files or folder on your Mac that you want to transfer. After you’ve selected the files or folders, click "Open" to start the transfer.
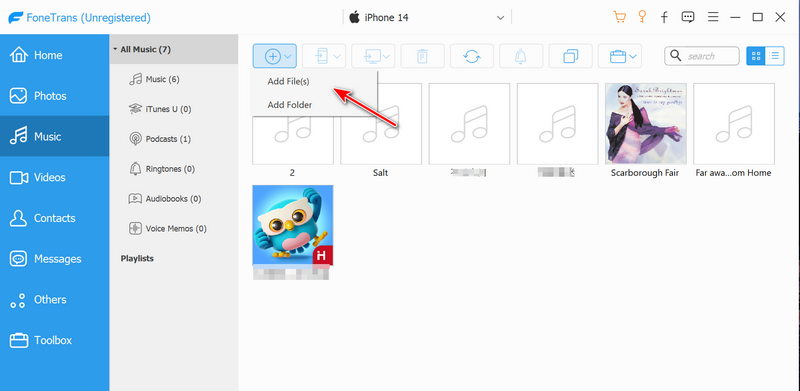
Wait for the Transfer to Complete: FoneTrans will start transferring the music from Mac to iPhone. Please do not disconnect the iPhone during the transfer process.
Advantages of FoneTrans for Music Transfer:
No Syncing Required: Unlike iTunes, FoneTrans doesn’t require syncing, which means you can transfer files directly to your iPhone without the risk of overwriting existing content.
Easy to Use: FoneTrans features a simple, intuitive interface, making it easy for users to navigate and manage their files.
Wide Range of File Types: FoneTrans supports a wide range of file types, including music, videos, photos, contacts, messages, and more. This makes it a versatile tool for all kinds of file transfers.
Two-Way Transfer: Not only can you transfer files from your Mac to your iPhone, but you can also transfer files from your iPhone to your Mac. This can be useful for creating backups of your iPhone’s content.
Music Management: It allows you to manage your music library, create playlists, and even convert incompatible music files to an iPhone-friendly format during the transfer process.
Method 3: The Built-in AirDrop Feature
AirDrop is a feature that allows you to wirelessly send and receive photos, documents, and more with nearby Apple devices. You can also use it to send individual music files from your Mac to iPhone. The music files sent this way won’t be added to your iPhone’s Music app. Instead, they’ll be accessible via the Files app or other apps that can handle music files. Here’s how you can do it:
Enable AirDrop on Your iPhone:
- Open the Control Center. On iPhone X or later, swipe down from the upper-right corner of the screen. On iPhone 8 or earlier, swipe up from the bottom of the screen.
- Press firmly or hold and press on the network settings card in the upper-left corner, then tap on AirDrop.
- Choose "Contacts Only" or "Everyone" as per your preference.
Enable AirDrop on Your Mac:
- Open a Finder window.
- Select "AirDrop" from the sidebar.
- Set your visibility to "Contacts Only" or "Everyone."
Transfer the Music File:
- Locate the music file you want to transfer on your Mac.
- Right-click on the file and select "Share," then "AirDrop."
- An AirDrop window will appear, showing nearby AirDrop users. Select your iPhone from the list.
- A notification will appear on your iPhone asking if you want to accept the files. Tap "Accept."
The Disadvantages of AirDrop for Music Transfer:
While AirDrop is a convenient way to transfer files between Apple devices, there are a few potential downsides you should be aware of:
Limited File Integration: Music files transferred via AirDrop don’t automatically integrate with the native Music app on your iPhone. They are accessible via the Files app or other apps that can handle music files.
Transfer Speed: While AirDrop is generally fast for small files, larger files (like high-quality music files or albums) may take a longer time to transfer, especially if there are many files being transferred simultaneously. You have to repeat the task if the connection is broken.
Proximity Requirement: Both devices need to be close to each other for AirDrop to work. It’s not suitable for remote transfers.
Privacy Concerns: If your AirDrop is set to "Everyone," you could receive unsolicited files from unknown devices. While you have the option to accept or decline these files, it could potentially pose privacy issues.
Why Can’t I Transfer Music from My Mac to My iPhone 14/13/12?
If you’re having trouble transferring music from Mac to iPhone, there could be several reasons. Here are a few potential issues:
Outdated Software: Your macOS, iTunes/Music app, or iOS may be outdated. Check to ensure you’re running the latest versions of these software.
Cable or Port Issues: Your USB cable may be faulty, or the USB port on your Mac or the Lightning port on your iPhone may have issues. Try a different cable, or try connecting to a different port.
iTunes/Music App Sync Issues: If you’re using iTunes or the Music app to sync music and it’s not working, it could be a software glitch. Try restarting both your Mac and iPhone.
Mismatched Settings: If you’re trying to sync music, ensure that "Sync Music" is enabled in the device’s settings in iTunes or the Music app. Remember, your iPhone can only be synced with one iTunes/Music library at a time.
Insufficient Storage Space: Your iPhone may not have enough free space to accommodate the music you’re trying to transfer.
Not Trusting Computer: Your iPhone must trust your Mac before it can transfer data. If prompted on your iPhone, be sure to tap "Trust."
DRM-Protected Songs: Some songs purchased from the iTunes Store or other services have Digital Rights Management (DRM) protection, which can prevent them from being transferred or played on unauthorized devices.
Apple Music Subscription: If you have an Apple Music subscription and iCloud Music Library turned on, you won’t be able to sync music manually through iTunes.
FAQs about iPhone Music Transfer on Mac
What kind of music does iPhone support?
The iPhone supports various audio file formats including AAC (M4A, M4B, M4P, up to 320 Kbps), MP3 (up to 320 Kbps), MP3 VBR, ALAC, AIFF, and WAV.
Why did Apple stop using iTunes?
Apple phased out iTunes to streamline and improve user experience. It separated the functionalities of iTunes into three distinct apps – Music, Podcasts, and TV, each focusing on a specific type of media, making content management more efficient and less cluttered.
Can I still use iTunes on M1 Mac?
iTunes as a standalone app is not available on Macs running macOS Catalina and later, including M1 Macs. Its functionalities have been split among the Music, Podcasts, and TV apps. However, you can still manage your device, make backups, and sync content using the Finder.
What replaces iTunes on new Mac?
On newer Macs running macOS Catalina and later, iTunes has been replaced by three apps: Music, Podcasts, and TV. Music management is now handled by the Music app, while the other two apps take over podcast and TV/movie management, respectively.
Our Final Words
Transferring music from Mac computer to iPhone can be done in a variety of ways, and the best method depends on your individual needs and circumstances. Traditional methods like using iTunes (or the Music app in macOS Catalina and later) are widely used due to their direct integration with Apple’s ecosystem. However, this approach has limitations like overwriting existing music, only allowing syncing with one library, and sometimes causing sync errors.
Alternative methods include using Apple Music with iCloud Music Library for a seamless experience across devices, using cloud services such as Google Drive or Dropbox, and using third-party applications like Aiseesoft FoneTrans that offer more flexibility and control over file transfers. You can also use AirDrop for quick, wireless transfer of individual music files, although this won’t integrate the transferred files with your iPhone’s Music app.