Table of Contents
Whether you’re setting up a new hard drive or dealing with compatibility issues with older systems, converting a disk’s partition style from GUID Partition Table (GPT) to Master Boot Record (MBR) can be a critical step. This process becomes a bit more challenging when you don’t have an operating system installed, but it’s not impossible. This guide will provide a step-by-step approach on how to convert GPT to MBR without an operating system using a bootable USB drive.
What’s GPT and MBR?
MBR (Master Boot Record) and GPT (GUID Partition Table) are two different types of disk partitioning methods. They dictate how the disk’s information is structured, allowing your system’s operating system to understand where data is stored.
MBR (Master Boot Record):
MBR is the older standard that has been used for many years. It’s supported by virtually every existing operating system, including all versions of Windows, macOS, and Linux.
- MBR only supports up to 4 primary partitions. However, one of these primary partitions can be extended and divided into several smaller partitions if necessary.
- MBR cannot handle disks larger than 2TB. If you have a disk larger than 2TB, MBR will only be able to manage the first 2TB of that disk.
- MBR stores all its information in one place. If this data is overwritten or corrupted, you could lose access to the entire disk.
GPT (GUID Partition Table):
GPT is the newer standard and is gradually replacing MBR due to its many advantages.
- GPT supports up to 128 partitions by default in Windows, and there’s no need for extended partitions.
- GPT stores multiple copies of its data across the disk. It also has CRC (Cyclic Redundancy Check) error checking to help prevent data corruption. If the data in the main partition table is corrupted, it can be recovered from another location on the disk.
- GPT is associated with UEFI (Unified Extensible Firmware Interface), which is designed to replace the old BIOS (Basic Input Output System) firmware interface.
While GPT is more robust and offers more compatibility with modern hardware, the necessity to use MBR might still arise in certain situations such as compatibility issues with some older systems or certain specific applications.
Why Convert GPT to MBR Without an Operating System?
Users often need to convert GPT to MBR without an operating system for specific reasons. Because some older computers may not have built-in support for GPT. That’s why converting to MBR becomes necessary to ensure compatibility and proper functioning of the hard drive.
Then certain legacy operating systems like older versions of Windows require the Master Boot Record (MBR) partitioning style for installation. That’s why users can successfully install these operating systems without any issues by converting from GPT to MBR.
- It allows for a seamless transition and compatibility between different operating systems on the same machine;
- It’s also worth noting that some disk management tools or data recovery software may have limitations or work more effectively with MBR partitions;
- And converting to MBR in such cases can facilitate the use of these tools and provide better access to the data stored on the hard drive.
The following methods involve using bootable media, such as a USB drive, to access disk management utilities and initiate the conversion process.
Solution 1. Convert GPT To MBR Without an Operating System Via Bootable USB Drive
Converting GPT to MBR without an operating system requires a USB drive. That’s because the PC needs to be in boot mode when trying to convert partition table. That’s why a USB flash drive is important in order to do this. And you will also have to download the EaseUS partition Master first.
EaseUS Partition Master is a versatile hard drive management tool that allows you to partition your hard drive, resize your existing partitions, and manage disk space. It’s a third-party software that’s popular among users due to its comprehensive feature set and user-friendly interface.
One of the key features of EaseUS Partition Master is its ability to convert disks between MBR (Master Boot Record) and GPT (GUID Partition Table) formats without data loss, which is a major advantage over some other tools that require wiping the disk during the conversion process.
Step 1. Connect the USB drive to your PC and then start up EaseUS Partition Master.
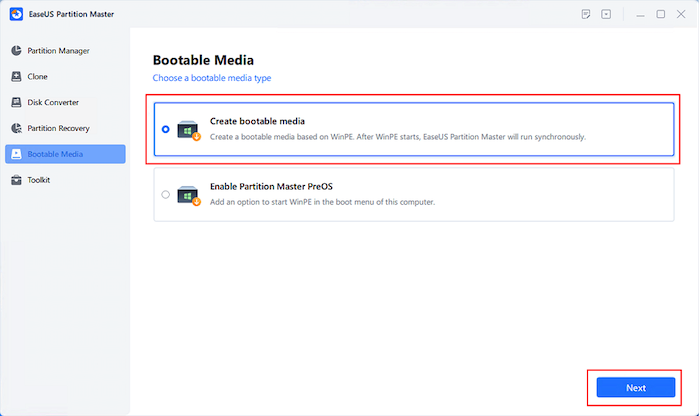
Step 2. Now head into the Bootable Media option and click on Create bootable media then click Next.
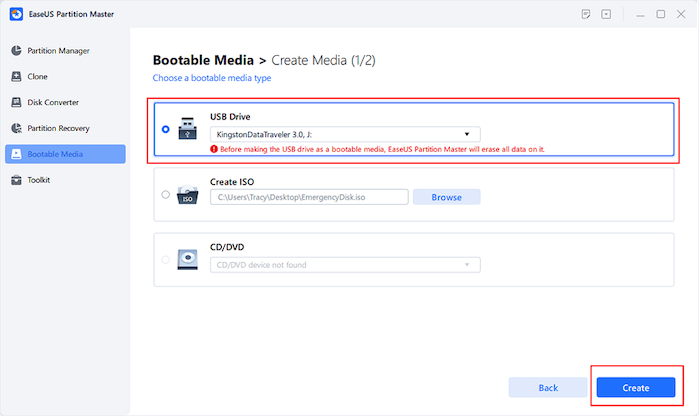
Step 3. Now select the USB device that you connected earlier and tap on Create option.
Step 4. Now restart your PC and boot from your USB.
Step 5. Now head into Disk Converter options when your PC restarts into EaseUS Partition Master.
Step 6. Then click on the Convert GPT to MBR option and wait for it to finish.
Step 7. Restart your PC and check the disk status in Disk Management or EaseUS Partition Master.
This is an essential process and one of the best ways to convert GPT to MBR without necessitating an operating system or having to reinstall OS. It’s vital to follow each of the steps demonstrated above. That’s why users must focus on the steps shown here and use a proper USB pen drive.
Solution 2. Convert GPT To MBR Without Operating System Using CMD
Another method users can try is using CMD to convert GPT to MBR. Now there are many people who do not trust this CMD technique as it threatens to wipe out your important data. That’s why it’s important that users attempt this technique with a lot of caution.
Simply because it requires you to understand using CMD properly. Users will also need USB or bootable DVD/CD to access the Windows installation screen. That’s why users should not attempt this in the command prompt on their installed Windows.
Otherwise this will cause data loss and might even corrupt the partition. Then you need to distinguish your partitions and use the correct commands to convert GPT to MBR. So now all that remains is the process and here is how it goes:
Step 1. Initiate the Windows installation process by booting from Bootable USB or DVD.
Step 2. Now press the Shift + F10 buttons on the keyboard to prompt CMD.
Step 3. Then type Diskpart.
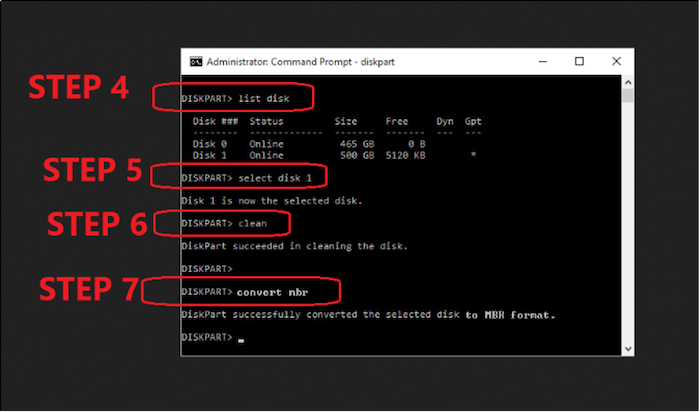
Step 4. Now type List Disk and note down the partition/disk to convert to MBR.
Step 5. Then type Select Disk 1 (replace 1 with the pertaining disk number).
Step 6. And type clean to erase all the data and partitions.
Step 7. Now type convert MBR and wait for the CMD to commence and finish the conversion.
Think of backing up your data before trying these CMD commands. It’s essential that you keep all of your important data secure and safe before trying this.
Solution 3. Convert GPT To MBR using GParted
GParted Live is a small bootable Linux distribution that contains the GParted application, which allows you to manage disk partitions. With GParted Live, you can resize, copy, and move partitions without data loss. You can also use it to change the partitioning scheme of a disk, for example from GPT (GUID Partition Table) to MBR (Master Boot Record).
Please remember that converting from GPT to MBR will erase all data on the disk. Always make sure to back up any important data before proceeding.
Here’s how to use GParted Live to convert GPT to MBR:
- Download GParted Live and Create Bootable Media:
- Download the GParted Live ISO from the GParted website.
- Create a bootable USB stick or burn the ISO image to a CD/DVD using a program like Rufus (for USB) or a built-in feature of your operating system (for CD/DVD).
- Boot from GParted Live:
- Insert the bootable media into your computer.
- Reboot your computer and enter the BIOS/UEFI setup (usually by pressing a key like F2, F12, DEL, or ESC during startup).
- Set your computer to boot from the USB stick or CD/DVD drive.
- Convert GPT to MBR with GParted:
- Once GParted Live boots, select "GParted Live (Default settings)" and press Enter.
- Once the GParted interface loads, select the GPT disk in the upper-right dropdown menu. The disk will likely be something like "/dev/sda".
- In the menu at the top, click on "Device" and then "Create Partition Table".
- A dialog will appear warning you that this will erase all data on the disk. If you have made a backup and are ready to proceed, choose "msdos" in the "New partition table type" dropdown, and click "Apply".
After applying these changes, the disk will be an MBR disk. You can then partition the disk as desired using GParted before exiting and rebooting into your normal operating system.
What Happens If I Change GPT to MBR?
MBR (Master Boot Record) and GPT (GUID Partition Table) are two different ways of storing the partitioning information on a disk. Both have their own advantages and disadvantages. If you’re considering converting an GPT disk to a MBR disk, there are a few things to be aware of:
- Data Loss Risk: Converting an GPT disk to a MBR disk usually requires deleting all the existing partitions and recreating them, which results in the loss of all data on the disk. You should back up all your data before performing this conversion.
- OS Compatibility: While GPT is newer and has more advantages over MBR, like support for more than four primary partitions and disks larger than 2TB, not all operating systems support it. As of my knowledge cutoff in September 2021, all modern versions of Windows, macOS, and Linux do support GPT. But if you’re using an older version or a less common operating system, you should check its compatibility before converting.
- Boot Compatibility: If you’re planning on booting from a GPT disk, you need a system that supports UEFI (Unified Extensible Firmware Interface). Many older systems only support BIOS (Basic Input/Output System), which can only boot from an MBR disk. Note that some systems may support both UEFI and BIOS.
- Post-conversion Check: After converting, you need to ensure your operating system recognizes the disk correctly and that it is using the full capacity of the disk (if it is over 2TB). If the disk is a boot disk, you may need to reinstall the operating system and restore your data from the backup.
- Recovery: Always make sure you have a recovery plan in case something goes wrong. This might include having a bootable USB stick ready and making sure your backups are up-to-date and accessible.
Remember, always back up your data before making such significant changes to your system.
FAQs about Changing GPT to MBR
Will converting from GPT to MBR erase my data?
Some tools require you to delete all partitions (which would erase all data) before converting the disk from GPT to MBR. However, certain tools like EaseUS Partition Master can perform this conversion without data loss. Nevertheless, it's always recommended to back up your data before making any major changes to your disk.
Does Windows support GPT and MBR?
Yes, modern versions of Windows support both GPT and MBR. However, to boot Windows from a GPT disk, the system must support UEFI (Unified Extensible Firmware Interface).
Can I switch back to GPT after converting to MBR?
Yes, you can switch back to GPT if you find that MBR doesn't meet your needs. However, just as when converting to MBR, you should back up your data before performing the conversion, as many tools will require deleting all partitions on the disk.
What are the risks of converting GPT to MBR?
The biggest risk when converting a disk is data loss. Even when using tools that claim to perform the conversion without data loss, there is always a chance something could go wrong. Therefore, you should always back up your data before converting a disk. Additionally, if the disk you're converting contains your operating system, you may need to reinstall it after the conversion.
Conclusion
These are the finest ways that you can convert GPT to MBR without using the operating system. It’s imperative to make sure none of the partitions that have any data in them.
Because the CMD method will remove all of the data by wiping the hard drive. And EaseUS Partition Master might risk it but it’s a better and dependable option. That’s why users must try the former option first but always back up their data.